
Table Saw Outfeed Table
In my initial shop layout, I had my original workbench/assembly table also serve as the outfeed table for the table saw. This worked out great. Even when I replaced the assembly table with the one I currently have, in the same shop layout it still served the dual purpose. However, like most woodworkers, the workshop is ever-changing (Lisa rolls her eyes when she hears “this layout won’t change” or something to that effect). I wanted to move things around a bit and try to better space my tools out to maximize the space (or so I thought, but more on that later). In the new configuration, the assembly table would no longer be in line with the table saw and could not serve as the outfeed table. There would be a gap of almost four feet between the saw and the assembly table. This wasn’t going to work when trying to rip large sheet goods. I needed to have some kind of outfeed table that wouldn’t take up much space.
I started looking around for inspiration on an outfeed table, specifically for a SawStop cabinet table saw. After seeing a few possibilities, I remembered watching a video from April Wilkerson at Wilker Do’s. She had the exact same saw and made a folding outfeed table that attached right to the saw itself. This was perfect!!! I could fold it up and drop it out of the way when it wasn’t needed, but it would be right there at the ready…if necessary.
April Wilkerson’s table saw outfeed table
It’s Great...Until It’s Not
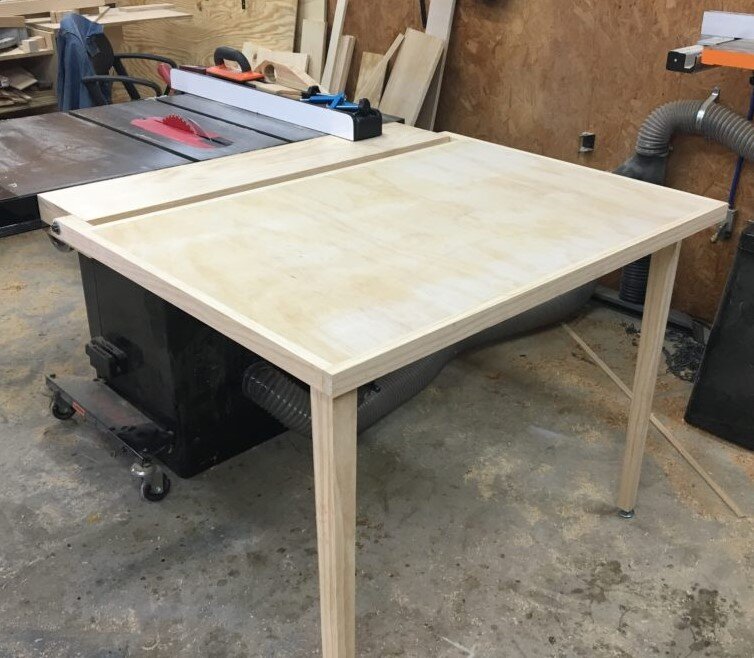
I bought and downloaded her plans and got to work. My outfeed wasn’t going to be exactly like April’s. I was planning on using a bunch of scraps to make everything so I wouldn’t have to buy another sheet of plywood. I had a few small particle board pieces from some old metal shelving laying around, so I figured I could use those for one side of the top. I had a little bit of trouble following April’s plans. I don’t know if it was just me or the plans. Either way, I got things figured out regardless.
Once I got the big cleat glued together and the groove cut in it for the rail on the table saw, I got it screwed in place with a couple of long lag screws. Next came the actual outfeed table itself. This was the piece I was having a hard time with when following the plans. I got the numbers straight and made the necessary holes to allow attaching of the table to the cleat. Once I got the folding legs screwed in place, everything was ready to go. I adjusted the feet on the folding legs to make sure everything lined up properly. I had to make sure that the outfeed table was just a little bit higher than the assembly table as any sheet goods I ran through the saw would start to flow into the assembly table.
I was quite happy once I got everything squared away. When the outfeed wasn’t needed, it just folded up right in front of the table saw and was out of the way. It was a worthwhile project for the shop and solved a problem. After having it in use for a year or so, however, it was becoming a bit of a hindrance. Every time I had the outfeed table up, it meant that I had to go all the way around the shop to get to the other side. There simply wasn’t enough room for my skinny butt to fit between the outfeed and the assembly table. There wasn’t much I could do about this, so I was resigned to living with it.


***RETIRED: July 2020***
I made a change to my workshop. I decided to replace my JET dust collector with a new unit from Harvey Woodworking. Because of the difference in shape and size of these two units, I decided that I should probably try to change my shop around to better fit the new tool and still be able to play Garage Tetris.
I was having a hard time incorporating everything together in any kind of arrangement. The biggest problem was the outfeed on the table saw. That was just causing so many problems in changing the layout. It finally dawned on me that I didn’t even need to use it in a different layout. As it turned out, the Table Saw & Router Cabinet that I built would serve just fine as an outfeed table. I had purposely designed it to be a little shorter than my table saw in case it needed to be used in that way in the future. Well, the future was now.
I took off the table portion of the outfeed and left the cleat in place. It still came in handy and it allowed me to keep the Table Saw & Router Cabinet a decent distance from the saw to ensure room for the saw’s dust collection. The folding outfeed table was officially retired. I took it apart and scrapped most of it. The two pieces of plywood used on the under side of the outfeed table were re-purposed for use on the bottom of my Rockler Material Mate cart.